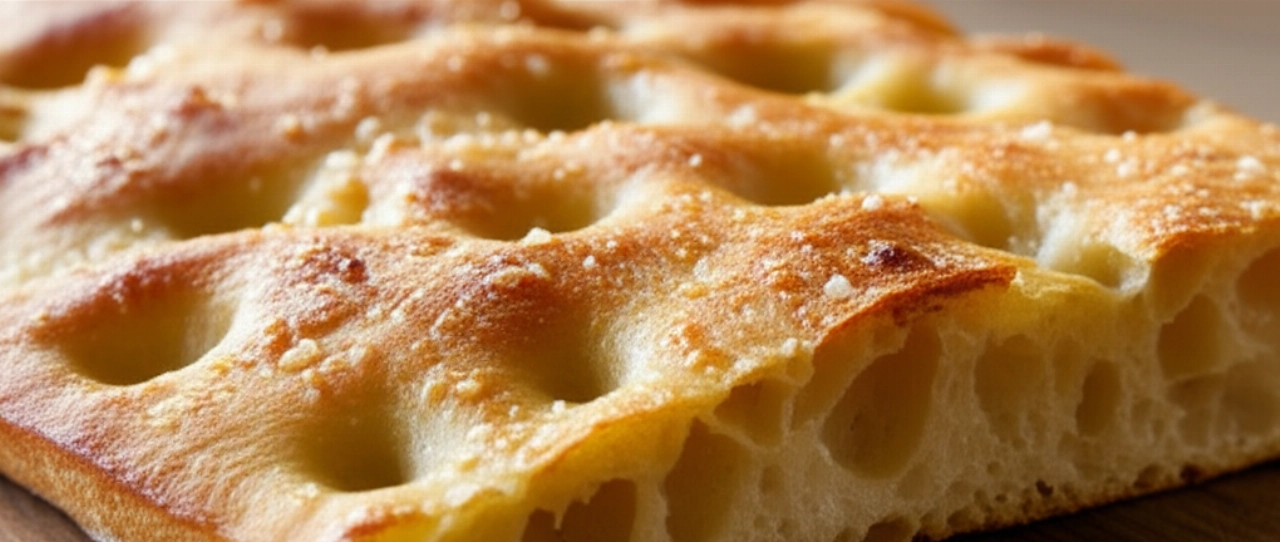
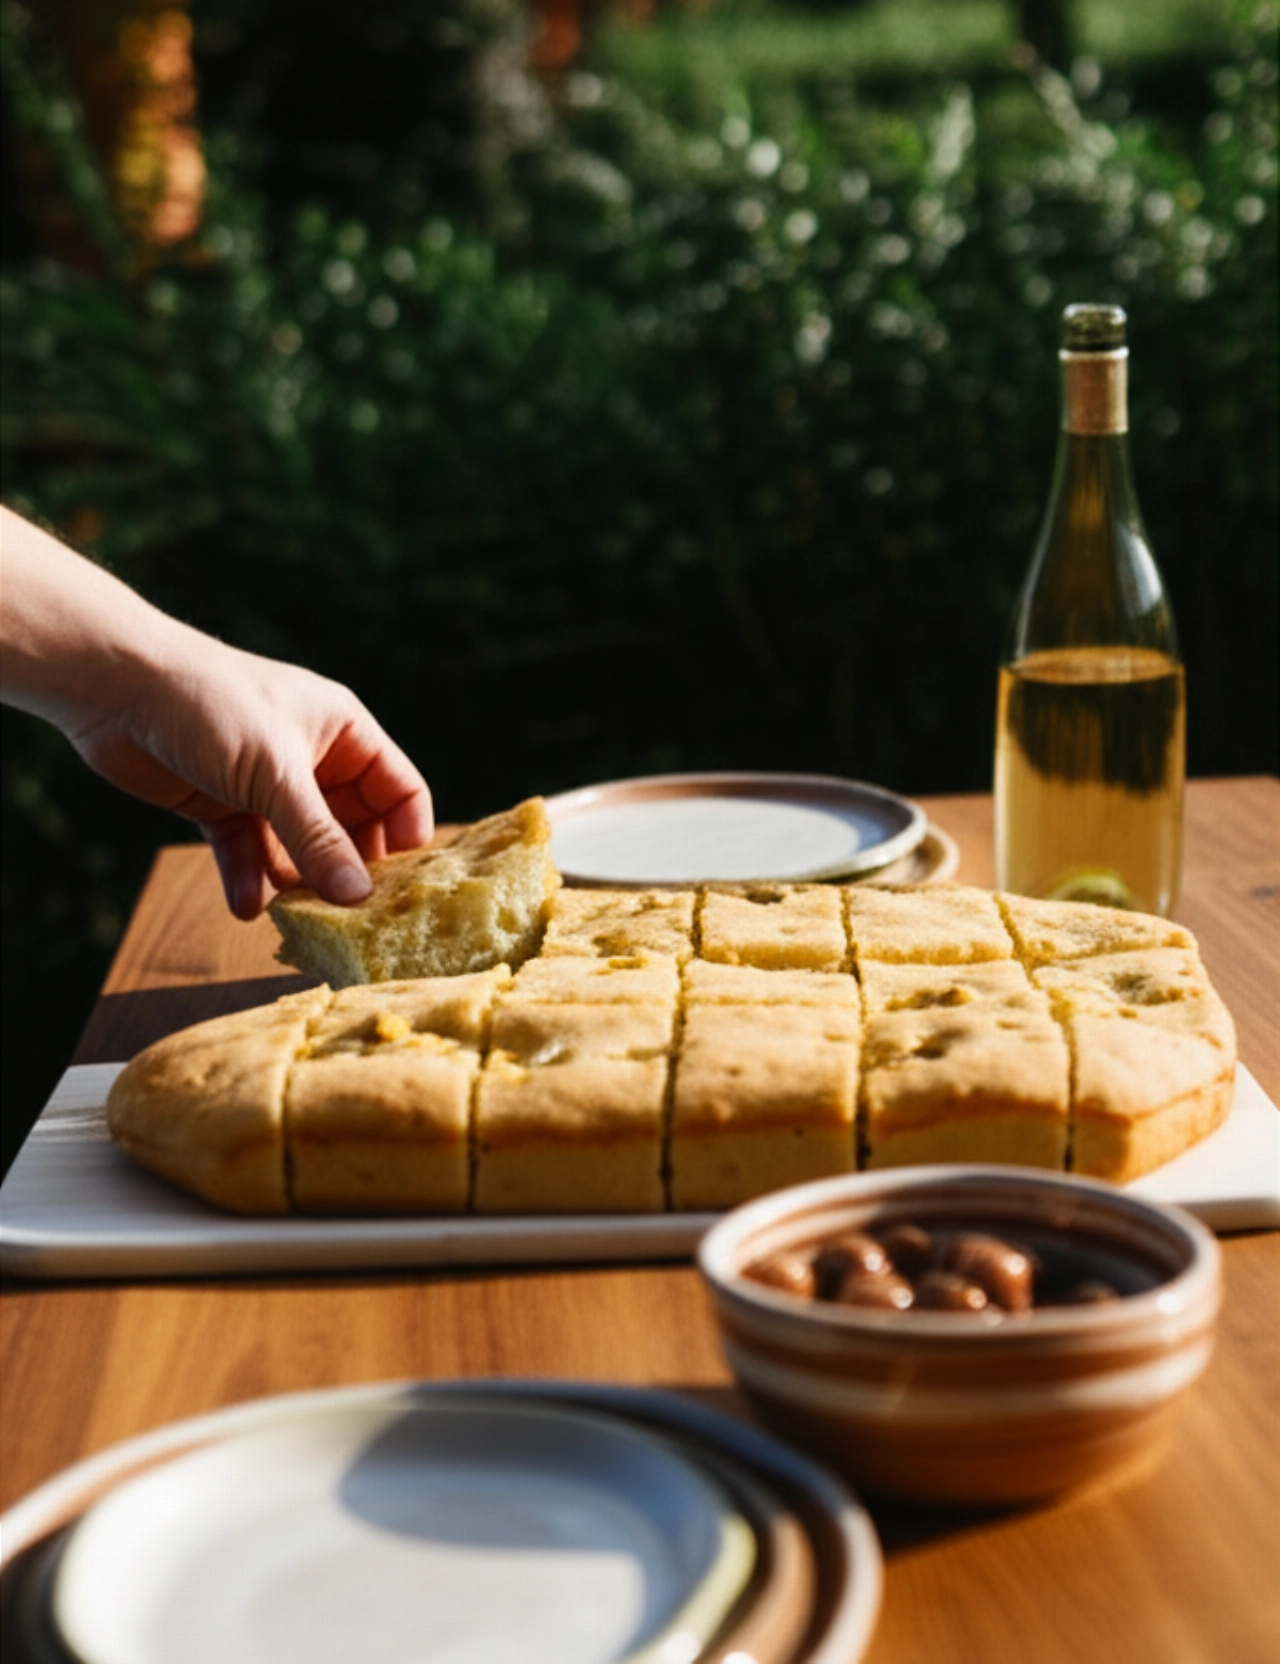
There's a scent that smells of home, of the sea, of Liguria, capable of making you close your eyes and dream. It's the scent of Genovese Focaccia, the real one, with its golden crust, incredibly soft interior, and those unmistakable holes that hold the salty brine and fragrant oil.
But how many times have you tried to make it and the result was a dry, rubbery focaccia or one without its characteristic 'eyes'? Finding the authentic recipe, the one that guarantees success, can seem like an impossible mission.
Make yourself comfortable, because on this page you won't just find a list of ingredients, but the definitive guide, full of tricks and tips passed down from generation to generation, to prepare the best and most authentic Genovese Focaccia you've ever tasted. Success is guaranteed, and your guests will ask for seconds!
Ingredients for an Infallible Genovese Focaccia: The Choice That Makes the Difference
To get a focaccia that makes you exclaim 'Wow!', the quality and choice of ingredients are fundamental. It's not just a list, but a reasoned selection, just like the most experienced grandmother would make.
- Flour: Use good quality 0 or 00 flour, with medium strength (W 260-280). It's essential for an elastic dough that rises well, capable of retaining fermentation gases and creating that airy structure.
- Water: The water must be lukewarm, not hot! It's the ideal environment to activate the yeast without 'scalding' it and compromising its activity.
- Yeast: Fresh or dry, the important thing is that it's active. I recommend fresh brewer's yeast for a more traditional result and an unmistakable aroma.
- Extra Virgin Olive Oil: This is the gold of focaccia! Choose a quality Ligurian oil, with a fruity but not too intense flavor. It's what gives softness, aroma, and that inviting shine. Don't skimp on quality!
- Salt: Fine salt in the dough and coarse salt on the surface. Coarse salt not only decorates but explodes in your mouth with a unique flavor, creating a delicious contrast with the softness of the dough.
- Brine: Water, oil, and salt. Very simple, but it's the key to perfect holes and to keeping the focaccia moist and flavorful. It's its biggest secret!
3 Common Mistakes That Ruin Genovese Focaccia (and How to Avoid Them)
Preparing focaccia may seem simple, but there are pitfalls that can compromise the final result. Here are the most common ones and how to avoid them, to guarantee success every time:
- Not respecting rising times: Haste is the enemy of good focaccia. Each rising phase is crucial for developing the gluten network and achieving the desired softness. Don't force the times; let the dough take its course, even if it takes a few extra hours. Patience will be rewarded!
- Not using the right amount of brine: Too little and the focaccia will be dry; too much and it will be soggy. The brine should be generous but not excessive; it should 'fill' the holes and create that salty crust on the surface. It's a delicate balance you'll learn to master.
- Baking at the wrong temperature or for too long: Focaccia needs a very hot oven to bake quickly and remain soft inside. Baking for too long or at a low temperature will make it hard and dry. Learn to know your oven and trust the aroma that will emanate!
The Secret of True Genovese Focaccia: The Brine and the "Pinch"
Genovese Focaccia is not just a dough; it's a technique, a ritual. The true secret, what makes it unique and unmistakable, is the combination of two fundamental elements: the brine and the 'pinch' (pizzicata), which is the creation of the holes.
The brine, an emulsion of water, oil, and salt, doesn't just add flavor. Poured over the dough before the last rise and baking, it penetrates the holes, creating that salty crust and keeping the inside incredibly moist and soft. It's an ancient trick, passed down by Ligurian bakers, that prevents the focaccia from drying out and gives it that salty 'crunch' on the surface that will make your mouth water.
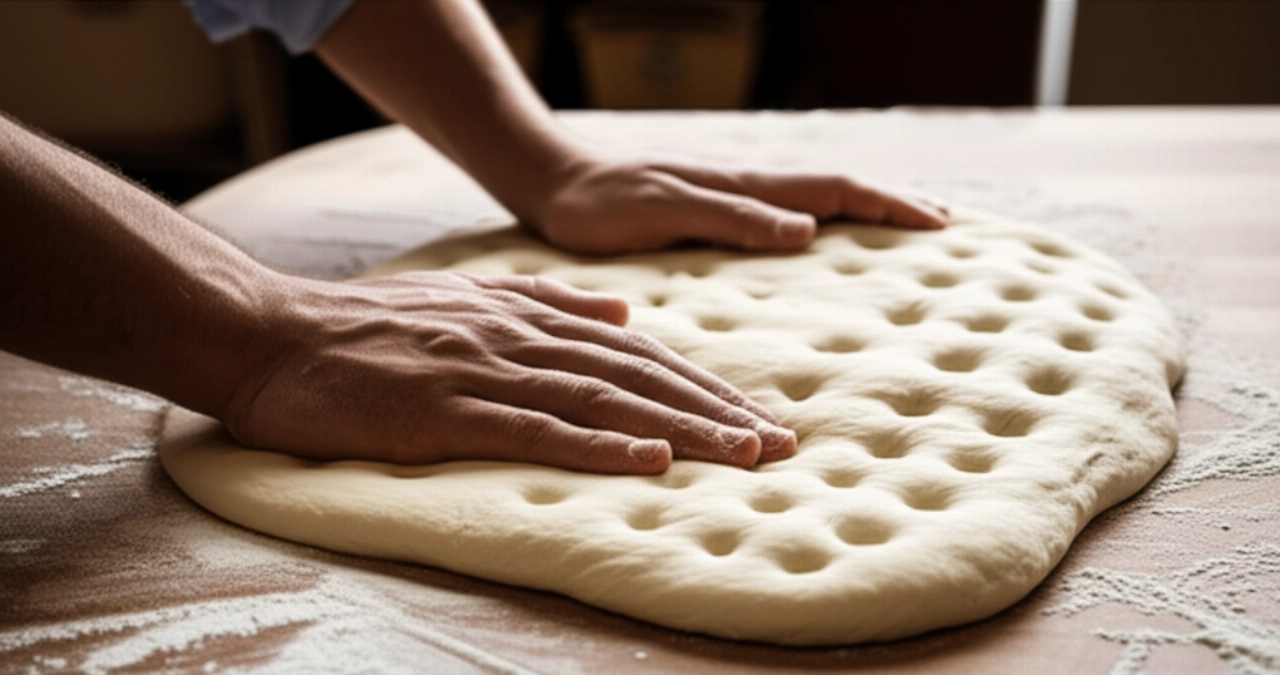
And the holes? They're not random! They should be made with your fingers, pressing well into the dough until you touch the bottom of the pan. It's in these 'eyes' that the brine collects, creating small pools of flavor that caramelize slightly during baking. This seemingly simple gesture is what distinguishes true Genovese focaccia from any other, giving it that unique texture and flavor that make it so beloved.
Let's Prepare Genovese Focaccia Together: The Step-by-Step Guide
Ingredients:
- 500g 0 or 00 flour (W 260-280)
- 350ml lukewarm water
- 10g fresh brewer's yeast (or 3-4g dry)
- 10g fine salt
- 30ml extra virgin olive oil (plus oil for the pan and brine)
For the brine:
- 50ml water
- 50ml extra virgin olive oil
- 5g fine salt
- Coarse salt for the surface
Tools:
- Stand mixer (or large bowl for kneading by hand)
- Rectangular baking pan (approx. 30x40 cm)
- Plastic wrap
Method:
- Activate the yeast: In a small bowl, dissolve the brewer's yeast in lukewarm water with a pinch of sugar (optional, helps the yeast). Let it rest for 5 minutes; you'll see a slight foam form on the surface: this is a sign that the yeast is alive and ready to work!
- Prepare the dough: In the bowl of a stand mixer (or a large bowl if kneading by hand), pour in the flour. Add the water with the yeast and begin kneading with the hook attachment (or by hand).
- Add the other ingredients: After a few minutes, when the dough starts to come together, add the fine salt and extra virgin olive oil. Continue kneading for at least 10-15 minutes (if by hand, up to 20 minutes) until you get a smooth, elastic, and homogeneous dough. It should pull away from the sides of the bowl and be firm.
- First rise: Lightly grease a large bowl with a drizzle of oil. Transfer the dough, cover with plastic wrap, and let it rise in a warm place (an unheated oven with the light on is perfect) for about 2-3 hours, or until it has doubled in volume. Don't rush!
- Stretch the dough: Generously grease a rectangular baking pan (approx. 30x40 cm) with extra virgin olive oil. Gently transfer the risen dough to the pan and, with oiled hands, gently stretch it to cover the entire surface. Don't force it; if it resists, let it rest for 5 minutes and then continue. It should be a gentle operation.
- Second rise and "pinching": Cover the pan with plastic wrap and let it rise for another 30-40 minutes. The dough should puff up slightly. At this point, with oiled fingers, gently but firmly press into the dough, creating the characteristic holes. Don't be afraid to touch the bottom of the pan; that's where the pools of flavor will form!
- Prepare and pour the brine: In a small bowl, emulsify the water, extra virgin olive oil, and fine salt for the brine. Pour this emulsion generously over the entire surface of the focaccia, ensuring it collects well in the holes. Sprinkle some coarse salt for an extra touch.
- Third rise: Let the focaccia rise in the pan for another 30-45 minutes, or until it is well puffed and the holes are even more evident. This is when the magic takes shape.
- Baking: Meanwhile, preheat the static oven to 220°C (425°F). Bake the focaccia on the middle rack for about 15-20 minutes, or until it is golden brown on the surface and bottom. The time may vary depending on your oven, so keep an eye on the color!
- Remove from oven and enjoy: Once baked, remove the focaccia from the oven and, if desired, brush another drizzle of extra virgin olive oil on the freshly baked surface to make it even shinier and more fragrant. Let it cool slightly before slicing and serving. The aroma will fill your kitchen!
Tips and Frequently Asked Questions about Genovese Focaccia
Here are some answers to the most common questions you might have, to clear up any doubts and guarantee you a perfect focaccia every time. We're here for that!
- Can I prepare the dough in advance? Absolutely! You can prepare the dough the night before and let it rise slowly in the refrigerator for 8-12 hours. The next day, take it out of the fridge at least an hour before stretching it and proceed with the recipe. Slow rising improves the flavor!
- Why doesn't my focaccia have holes? The holes are formed thanks to the "pinching" and the brine that collects inside them. Make sure to press your fingers well into the dough until you touch the bottom of the pan and be generous with the brine. Don't be afraid to be firm!
- My focaccia is too dry/rubbery, what did I do wrong? It might have been baked for too long or at too low a temperature. Focaccia needs quick, high-temperature baking to remain soft. Another cause could be a lack of brine or insufficiently hydrated dough. Double-check your measurements!
- Can I freeze focaccia? Absolutely yes! Once baked and cooled, you can cut it into pieces and freeze it. To thaw, leave it at room temperature or warm it slightly in the oven for a few minutes. It will be like freshly baked!
- Can I add other ingredients? The traditional Genovese recipe is simple, with just oil and salt. However, if you want to experiment, you can add Taggiasca olives, rosemary, or caramelized onions after the "pinching" and before the brine. But for the first time, I recommend sticking to tradition!
There you have it! Now you no longer just have a recipe, but all the secrets to bring a piece of Liguria to your table, a scent that smells of home, tradition, and love. Your Genovese Focaccia will be a masterpiece of softness and flavor, and it will make you feel like a true Ligurian baker!
Don't be afraid to experiment. Cooking is an act of creativity and sharing. But start with this solid base, and you'll see that applause won't be lacking. It will be the focaccia everyone asks you to make again, I guarantee it!
Have you tried our recipe? We're very curious to see your masterpiece! Leave a comment below, tell us how it went, or share a photo on Instagram tagging @CercaRicette.it. If you loved this focaccia, you can't miss our recipe for perfect pizza dough or for a classic like homemade Genovese Pesto. Keep cooking with us, your kitchen awaits!